#!/usr/bin/perl
use DBI;
require "$ENV{HOME}/perl/setEnv.pl";
my $dbh = DBI->connect( "dbi:Oracle:$topprod", "$echoUser", "$echoPass" )
|| die( $DBI::errstr . "\n" );
$dbh->{LongReadLen} = 50000000; # Make sure buffer is big enough for BLOB
my $sth = $dbh->prepare(q{
select regexp_substr(gca01,'ASO[789]-.*') oea01,
gcb07,gcb09
from gca_file,gcb_file
where gca07 = gcb01
and gca01 in (
select 'oea01='||oga16 gca01
from echo01.oga_file
where oga913 = to_date('20151001','yyyymmdd')
and regexp_like(oga01,'^ASH[789]-')
)
}) || die "\nPrepare error: $DBI::err .... $DBI::errstr\n";;
$sth->execute() || die "\nExecute error: $DBI::err .... $DBI::errstr\n";
&blobSelect();
sub blobSelect()
{
while (@data = $sth->fetchrow_array())
{
open FILE, "> $data[0]_$data[1]";
print FILE $data[2];
close FILE;
}
$sth->finish();
}
2015年11月18日 星期三
2015年11月15日 星期日
PHP install OCI (RHEL / CentOS / Fedora)
http://antoine.hordez.fr/2012/09/30/howto-install-oracle-oci8-on-rhel-centos-fedora/
1.
yum install php.x86_64 ()
yum php-mysql.x86_64 (不確定)
yum install php-pear
yum install php-devel
2.
pear download pecl/oci8
tar vzf oci8-x.x.x.tar
cd oci8-x.x.x/
phpize
(確認整個OS只有一個php/phpize/
我在這裡吃了大苦頭。由於有兩個版本,compile一直用到舊版本。
如果有舊版本,通常會在/usr/loca/bin裡面,可以用find / -name php...找。
但是使用yum install php... 安裝的通常在/usr/bin,而$PATH的/usr/local/bin通常又先於/usr/bin,所以一直抓到舊版)
3.
./configure --with-oci8=shared,instantclient,/usr/lib/oracle/xxx/client64/lib/ (xxx是Oracle 版本)4.
1.
yum install php.x86_64 ()
yum php-mysql.x86_64 (不確定)
yum install php-pear
yum install php-devel
2.
pear download pecl/oci8
tar vzf oci8-x.x.x.tar
cd oci8-x.x.x/
phpize
(確認整個OS只有一個php/phpize/
ph-config/pecl/pear/peardev/的版本,我在這裡吃了大苦頭。由於有兩個版本,compile一直用到舊版本。
如果有舊版本,通常會在/usr/loca/bin裡面,可以用find / -name php...找。
但是使用yum install php... 安裝的通常在/usr/bin,而$PATH的/usr/local/bin通常又先於/usr/bin,所以一直抓到舊版)
3.
./configure --with-oci8=shared,instantclient,/usr/lib/oracle/xxx/client64/lib/ (xxx是Oracle 版本)4.
make
make install
5.
setsebool -P httpd_execmem 1 (如果有啟動SEinux)
6.
vi /etc/php.ini
or
make install
5.
setsebool -P httpd_execmem 1 (如果有啟動SEinux)
6.
vi /etc/php.ini
[OCI8]
extension=oci8.so
extension=oci8.so
cd /etc/php.d
vim oci8.ini
extension=oci8.so
vim oci8.ini
extension=oci8.so
以下為原文
HOWTO install Oracle OCI8 on RHEL / CentOS / Fedora
How to install OCI8 (PHP extension to access Oracle Databases) on a RHEL / Fedora Linux system.
Download from http://www.oracle.com/technetwork/database/features/instant-client/index-097480.html :
EDIT 2013/09/24 : http://www.oracle.com/technetwork/topics/linuxx86-64soft-092277.html
Install some prerequisite
Download the OCI8 extension
Configure the extension with your Oracle client library path (change the path …/11.2/… with your own version) :
Compil and install
Configure SELinux : allows httpd to execute programs that require memory addresses that are both executable and writeable
Add the folowing configuration at the end of php.ini
Restart Apache
That’s all folks.

Download from http://www.oracle.com/technetwork/database/features/instant-client/index-097480.html :
EDIT 2013/09/24 : http://www.oracle.com/technetwork/topics/linuxx86-64soft-092277.html
- RPM Instant Client Package – SDK: Additional header files and an example makefile for developing Oracle applications with Instant Client
- RPM Instant Client Package – Basic: All files required to run OCI, OCCI, and JDBC-OCI applications
rpm -ivh instantclient-basic-linux.XXX.rpm
rpm -ivh instantclient-sdk-linux.XXX.rpm
rpm -ivh instantclient-sdk-linux.XXX.rpm
yum install php-pear
yum install php-devel
yum install php-devel
pear download pecl/oci8
tar xvzf oci8-1.4.7.tgz
cd oci8-1.4.7/
phpize
tar xvzf oci8-1.4.7.tgz
cd oci8-1.4.7/
phpize
./configure --with-oci8=shared,instantclient,/usr/lib/oracle/11.2/client64/lib/
make
make install
make install
setsebool -P httpd_execmem 1
vi /etc/php.ini
[OCI8]
extension=oci8.so
extension=oci8.so
service httpd restart
2015年11月10日 星期二
PHPMail 寄 html
#!/usr/bin/php
<?php
$cnt = 0;
$text;
function getData() {
require "/root/php/setEnv.php";
//EIP Connect
$con = new mysqli("$hostEIP","$usernameEIP","$passwordEIP","$databaseEIP");
if ($con->connect_errno)
{
die('Could not connect: ' . $con->connect_error());
}
mysqli_set_charset($con,"utf8");
$stmt = $con->prepare("
SELECT account_lastname, vfs_directory, vfs_name,
concat( 'http://xxx.xxx.xxx.xxx/eipplus/index.php?menuaction=filemanager.uifilemanager.index&path_id=', vfs_file_id ) link
FROM hplus_vfs, hplus_accounts
WHERE vfs_directory LIKE '%共用文件區%'
AND vfs_mime_type LIKE 'application%'
AND vfs_createdby_id = account_id
AND vfs_created >= sysdate( ) - 144000
");
$stmt->bind_result($name,$dir,$file,$link);
$stmt->execute();
$GLOBALS['text'] = "EIP 共用文件區新增檔案通知,有需要同仁可上EIP自行下載:<br> <br>\n";
$GLOBALS['text'] .= " <table style=' border: 1px solid #aaa; border-collapse: collapse; '> \n";
$GLOBALS['text'] .= " <tr> <th style='border: 1px solid #c3c3c3; background-color: #efefef;'> 上傳人員 </th> <th style='border: 1px solid #c3c3c3; background-color: #efefef;'> 上傳目錄 </th> <th style='border: 1px solid #c3c3c3; background-color: #efefef;'> 檔案名稱 </th> <th style='border: 1px solid #c3c3c3; background-color: #efefef;'> EIP連結 </th> </tr> \n";
while($stmt->fetch())
{
$GLOBALS['text'] .= " <tr> <td style='border: 1px solid #c3c3c3;'> $name </td> <td style='border: 1px solid #c3c3c3;'> $dir </td> <td style='border: 1px solid #c3c3c3;'> $file </td> <td style='border: 1px solid #c3c3c3;'> $link </td> </tr>\n";
$GLOBALS['cnt'] += 1;
}
$GLOBALS['text'] .= " </table> \n";
#$GLOBALS['text'] = "EIP 共用文件區新增檔案通知,有需要同仁可上EIP自行下載:<br> <br>";
#while($stmt->fetch()) {
# $GLOBALS['text'] .= "上傳人員 : $name<br>上傳目錄 : $dir<br>檔案名稱 : $file<br>EIP連結 : $link<br> <br>";
# $GLOBALS['cnt'] += 1;
#}
#echo $text;
#echo $cnt;
#echo $GLOBALS['cnt'];
$stmt->close();
$con->close();
}
function sendMail() {
require_once('/root/php/PHPMailer/class.phpmailer.php');
require_once('/root/php/PHPMailer/class.smtp.php');
require "/root/php/setEnv.php";
$phpmail = new PHPMailer();
$phpmail->IsSMTP(true);
#$phpmail->IsHTML(true);
$phpmail->Host = 'xxx.xxx.xxx.xxx';
$phpmail->CharSet = "utf-8";
$phpmail->From = 'mis@xxx.xxx.xxx.xxx';
$phpmail->FromName = 'EIP 自動寄信通知';
$phpmail->Subject = 'EIP 共用文件區新增檔案通知';
$html = $GLOBALS['text'];
#echo $html;
#$phpmail->Body = "<h1>Test 1 of PHPMailer html</h1><p>This is a test</p>";
#$phpmail->Body = "<html><table style='border: 1px solid #ccc;'></table><html>";
$phpmail->MsgHTML($html);
#$phpmail->MsgHTML("test");
#$phpmail->AddAttachment( "/tmp/MailNoPrice.csv" , '有庫存無訂價.csv' );
#$phpmail->AddAddress( $mailNoPriceList,'商品行銷' );
#$phpmail->AddAddress( $mailNoPriceListVGM,'副總' );
#$phpmail->AddAddress( $mailNoPriceListFIN1,'財務主管1' );
#$phpmail->AddAddress( $mailNoPriceListFIN2,'財務主管2' );
$phpmail->AddAddress( "xxx@xxx.xxx.xxx.xxx",'全公司' );
if(! $phpmail->Send())
{
echo "通知信件寄出失敗";
echo "Mailer Error : " . $mail->ErrorInfo;
exit;
}
echo "通知信件已寄出";
}
function main() {
getData();
if ($GLOBALS['cnt'] > 0) {
sendMail();
}
}
main();
?>
2015年11月4日 星期三
PHP date (BigInt to String) and mktime (String or Integer to BigInt) conversion
<?php
echo date('H:i:s d-M-Y', 1446778800);
echo "<br>";
echo date('H:i:s d-M-Y', 1446786000);
echo "<br>";
//時,分,秒,月,日,年
$mytimestamp = mktime(11,0,0,11,6,2015);
echo "$mytimestamp";
echo "<br>";
echo date('H:i:s d-M-Y', 1446778800+36000);
echo "<br>";
echo date('H:i:s d-M-Y', 1446786000+36000);
echo "<br>";
?>
11:00:00 06-Nov-2015
13:00:00 06-Nov-2015
1446778800
21:00:00 06-Nov-2015
23:00:00 06-Nov-2015
2015年11月1日 星期日
CSS 文字垂直置中技巧
http://www.wibibi.com/info.php?tid=151
CSS 文字垂直置中技巧
會寫這一篇是因為在 CSS 中要水平置中相當簡單,只要使用 text-align 即可,但是垂直置中就不是這麼容易的事情,其實說難也不難,只要用一點小技巧就可以做出文字垂直置中的效果,本篇用的是 line-height 行高的技巧。
CSS 文字垂直置中範例
由此範例可以看到文字已經在區塊垂直方向置中了,甚至連水平都置中了。
稍為解說一下這段語法,手先是 DIV 區塊將文字包在裡面,style 的部分,我們設定了背景顏色(background-color:#C7FF91)、寬度(width:300px)、高度 (height:100px)、水平置中對齊(text-align:center)以及最重要的 line-height100px。
由於 DIV 區塊的高度設定為 100px,這時候設定文字的 line-height(行高)也是 100px,就自然而然的垂直置中囉!
延伸閱讀
CSS 文字垂直置中範例
<DIV style="border-style:solid;background-color:#C7FF91;width:300px;height:100px;text-align:center;line-height:100px;">
測試文字垂直置中
</DIV>
呈現結果測試文字垂直置中
</DIV>
測試文字垂直置中
test
由此範例可以看到文字已經在區塊垂直方向置中了,甚至連水平都置中了。
稍為解說一下這段語法,手先是 DIV 區塊將文字包在裡面,style 的部分,我們設定了背景顏色(background-color:#C7FF91)、寬度(width:300px)、高度 (height:100px)、水平置中對齊(text-align:center)以及最重要的 line-height100px。
由於 DIV 區塊的高度設定為 100px,這時候設定文字的 line-height(行高)也是 100px,就自然而然的垂直置中囉!
延伸閱讀
CSS position 觀念筆記心得
http://blog.rx836.tw/blog/css-positioning/
css position 對於初學者來說觀念很容易混淆,我在剛學習時也很常搞不清楚relative和absolute之間的關係,但只要抓到幾個訣竅重點,其實可以很輕鬆的掌握它,這篇是紀錄我自己學習css position的心得,搭配幾個簡單易懂的範例,讓大家一起成長
css


特別注意的是,static並不會受 top、bottom、left 和 right 這些屬性值影響
css

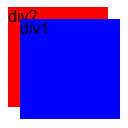
藍色的div從原本的位置往右下角位移了,從原始位置的左上角為起點,遠離左邊(left)20px的差距,遠離上面(top)也是20px的差距,但還是保留原本位置的空間,並且覆蓋到d2,注意我這邊特別註明是原本的位置,因為這會跟等下介紹的 absolute 有所不同,那有些人或許會有疑問,可以用 margin 取代嗎?我們來實驗一下

有明顯的發現,利用屬性margin做位移,元素並沒有覆蓋堆疊的問題,但會影響到其它的元素位置,這是要特別注意小心的地方,不可不慎
absolute是從整個頁面的視窗開始算起(感謝網友底下留言補充,這邊應該講從最近一個有 "position: relative" 的 parent node 開始算),並且並不會保留它原本的空間,範例如下
有發現藍色的<div>完全無視其它的元素存在,也不會干擾到其它的元素,因為它的原始空間也消失了,自己獨立起來自成一格,看起來還 蠻容易了解的,不過有一個地方是初學者很容易混淆的,就是當relative和absolute一起使用時,那情形就會跟我們設想的不太一樣,範例如下
css

會發現藍色的<div>是從id為d3的<div>左上角開始定位,這代表是說,如果屬性值為absolute的<div>,上面還有被其它元素包住,就要注意位移計算的起始值會有所不同,那如果將relative移除的話呢?

嗯!定位又從頁面視窗的左上角當作起始點囉,如果覺得範例感覺不到效果,可以將top和left的值加大,會更明顯
1.它的位移起始的依據永遠都是視窗頁面,也就是說就算它有relative的父元素,並不會受到影響
2.它會跟著scroll移動,也就是說當畫面被往下拉時,該元素會跟隨著移到相對的位置
基於以上兩點的特色,我們就可以做出永遠固定在視窗某個地方的元素

像是 pinterest 就有用到類似的效果,不過記得要搭配 * z-index* 來做元素堆疊
另外除了上面討論的四個屬性值以外,CSS3其實還有新增另外兩個,分別叫做 position: center 和 position: page,不過因為非主流且各瀏覽器支援程度很低,有興趣的人在自行研究即可
Learn CSS Positioning in Ten Steps(10個步驟學習CSS Position)
CSS Position 位置
內容如有錯誤,歡迎指正
[CSS] CSS position 觀念筆記心得
Start
首先,css position 屬性共有四個值,分別為 static、relative、absolute、fixed,其中,當你沒有設定position時,預設為static,下面就來介紹這四個值的差別static
就如剛剛所提到的,static是預設值,意思是說,就算你沒宣告position這個屬性,默認還是為static,而通常這時候會影響到元素的位置,就是看它本身是 block 或是 inline,例如兩個<div>因為是block的關係,所以會上下各占據一行,那如果是兩個<span>,因為是inline,所以會在同一行裡面呈現css
#d1{
    width: 100px;
    height: 100px;
    background: blue;
}
#d2{
    width: 100px;
    height: 100px;
    background: red;
}
#s1{
        background: blue;
    }
#s2{
        background: red;
    }
<div id="d1">
div1
</div>
<div id="d2">
div2
</div>
<span id="s1">span1</span><span id="s2">span2</span>
特別注意的是,static並不會受 top、bottom、left 和 right 這些屬性值影響
relative
假如元素的position屬性值設為relative,就會受到 top、bottom、left 和 right 這些值影響所在位置,利用剛剛的範例,我們增加position屬性值和一些位移看看結果css
#d1{
    width: 100px;
    height: 100px;
    background: blue;
    position: relative;
    top: 20px;
    left: 20px;
}
#d2{
    width: 100px;
    height: 100px;
    background: red;
}
藍色的div從原本的位置往右下角位移了,從原始位置的左上角為起點,遠離左邊(left)20px的差距,遠離上面(top)也是20px的差距,但還是保留原本位置的空間,並且覆蓋到d2,注意我這邊特別註明是原本的位置,因為這會跟等下介紹的 absolute 有所不同,那有些人或許會有疑問,可以用 margin 取代嗎?我們來實驗一下
#d1{
    width: 100px;
    height: 100px;
    background: blue;
    margin-top: 20px;
    margin-left: 20px;
}
#d2{
    width: 100px;
    height: 100px;
    background: red;
}
有明顯的發現,利用屬性margin做位移,元素並沒有覆蓋堆疊的問題,但會影響到其它的元素位置,這是要特別注意小心的地方,不可不慎
absolute
absolute 跟relative很像,差別在於位移時是從哪個起始點開始算起,剛剛的relative是從原本的位置開始算,而#d1{
width: 100px;
height: 100px;
background: blue;
position: absolute;;
top: 20px;
left: 20px;
}
#d2{
width: 100px;
height: 100px;
background: red;
}
有發現藍色的<div>完全無視其它的元素存在,也不會干擾到其它的元素,因為它的原始空間也消失了,自己獨立起來自成一格,看起來還 蠻容易了解的,不過有一個地方是初學者很容易混淆的,就是當relative和absolute一起使用時,那情形就會跟我們設想的不太一樣,範例如下
css
#d1{
    width: 100px;
    height: 100px;
    background: blue;
    position: absolute;;
    top: 20px;
    left: 20px;
}
#d2{
    width: 100px;
    height: 100px;
    background: red;
}
#d3{
position: relative;
width: 300px;
height: 300px;
border: solid 1px orange;
}
<div id="d3">
    <div id="d1">
    div1
    </div>
    <div id="d2">
    div2
    </div>
</div>
會發現藍色的<div>是從id為d3的<div>左上角開始定位,這代表是說,如果屬性值為absolute的<div>,上面還有被其它元素包住,就要注意位移計算的起始值會有所不同,那如果將relative移除的話呢?
嗯!定位又從頁面視窗的左上角當作起始點囉,如果覺得範例感覺不到效果,可以將top和left的值加大,會更明顯
fixed
最後講到的是fixed,它常被用於在Menu bar,位置也是受到 top、bottom、left 和 right 這些值影響,跟absolute類似,但有兩個不一樣的地方1.它的位移起始的依據永遠都是視窗頁面,也就是說就算它有relative的父元素,並不會受到影響
2.它會跟著scroll移動,也就是說當畫面被往下拉時,該元素會跟隨著移到相對的位置
基於以上兩點的特色,我們就可以做出永遠固定在視窗某個地方的元素
像是 pinterest 就有用到類似的效果,不過記得要搭配 * z-index* 來做元素堆疊
結論
其實網路上有很多很好的文章在討論關於css position的用法和觀念,也有很多很漂亮的排版,但只要掌握好基本觀念,我相信對於那些複雜的layout也可以輕鬆的理解另外除了上面討論的四個屬性值以外,CSS3其實還有新增另外兩個,分別叫做 position: center 和 position: page,不過因為非主流且各瀏覽器支援程度很低,有興趣的人在自行研究即可
參考資料:
CSS Positioning: A Comprehensive LookLearn CSS Positioning in Ten Steps(10個步驟學習CSS Position)
CSS Position 位置
內容如有錯誤,歡迎指正