2020年5月28日 星期四
2020年5月24日 星期日
VNCserver初始設定與自動啟動
http://blog.pulipuli.info/2008/07/vncserver.html
VNC是遠端桌面控制很方便的工具,這一篇記錄著如何安裝、初始設定以及開機自動啟動VNCserver的方法。
請輸入以下指令以啟動VNC Server:
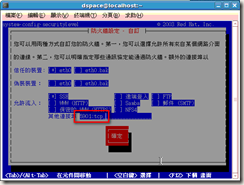
選單依序選擇:防火牆設定 => 自訂 => 其他連接埠,填入5801:tcp。結果如下圖:
確認完畢之後一一退出,即完成設定。
請在瀏覽器網址列輸入以下網址:
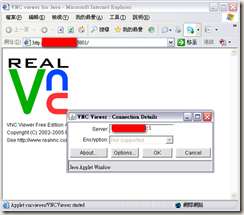
輸入OK,然後輸入密碼,如下畫面:

便可以正常開啟遠端桌面,解析度會比較差是正常的事情。

解決方法是修改遠端Server上的輸入法切換組合鍵。
設定位置在「系統→偏好設定→更多偏好設定→SCIM輸入法設定」。
進入「介面(前端)→全域設定→快速鍵→作用鍵→…」。

作用鍵勾選「Ctrl」跟「Alt」,按下「新增」。
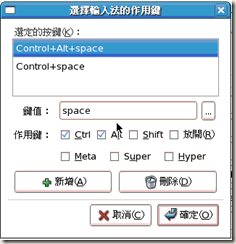
全部確定退出之後,就可以用「Ctrl + Alt + Space」叫出中文輸入法了。
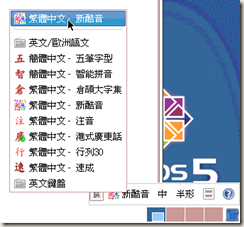
點選輸入法工具列就可以選擇其它輸入法使用。
VNC是遠端桌面控制很方便的工具,這一篇記錄著如何安裝、初始設定以及開機自動啟動VNCserver的方法。
測試環境
- CentOS 5 Final Release (義守大學檔案伺服器 /Linux/CentOS)
- vnc-server-4.1.2-9.el5 (RPM下載列表)
確認是否安裝VNC Server
#rpm -q vnc vnc-server 如果已經安裝,那麼系統會直接顯示VNC Server的版本訊息:vnc-server-4.1.2-9.el5 安裝VNC Server
由於CentOS 5預設已經安裝好VNC了,因此手動安裝VNC的步驟在此就省略。設定啟動VNC Server時自動啟用帳號
以root權限修改vncservers#vim /etc/sysconfig/vncservers 如果你要以dspace帳號登入,登入桌面為1024x768,那麼加入以下設定:VNCSERVERS="1:dspace"
VNCSERVERARGS[1]="-geometry 1024x768" 設定完成之後,每次啟用VNC Server的服務時,都會自動啟動該帳號的vncserver。請輸入以下指令以啟動VNC Server:
service vncserver start 開機自動啟動VNC Server
以root權限加入開機自動啟動VNC Server#vim /etc/rc.d/rc.local 加入以下設定service vncserver start 確認以上步驟完成之後,接著重新啟動,就能夠開啟VNC Server。設定VNC的密碼
請切換到你預設要登入的使用者帳號,此範例中以dspace作為我預設登入的帳號。可使用su指令來切換,系統會提示你輸入密碼(除非你是root):su dspace 執行vncpasswd來設定密碼#vncpasswd
Password: //輸入 VNC 密碼
Verify: //再輸入一次 VNC 密碼以確認 修改顯示設定成為安裝的X-Win
接著修改連接設定。如果你沒有在自己設定的帳號裡找到.vnc/xstartup,那你得回到之前的步驟,把VNC Server設定好之後一一啟動,他才會產生xstartup這個檔案。#vim ~/.vnc/xstartup 該檔案的內容如下,請將SESSION_MANAGER與exec /etc/X11/xinit/xinitrc開頭的#註解拿掉,其他行則加上註解。參考如下:#!/bin/sh
# Uncomment the following two lines for normal desktop:
unset SESSION_MANAGER
exec /etc/X11/xinit/xinitrc
#[ -x /etc/vnc/xstartup ] && exec /etc/vnc/xstartup
#[ -r $HOME/.Xresources ] && xrdb $HOME/.Xresources
#xsetroot -solid grey
#vncconfig -iconic &
#xterm -geometry 80x24+10+10 -ls -title "$VNCDESKTOP Desktop" &
#twm & 修改防火牆設定(透過setup指令)
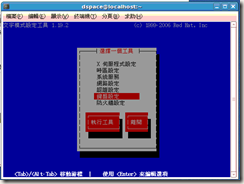
必需要修改防火牆的設定,你才能讓外面的使用者連到VNC Server。輸入以下指令# setup 如果非root權限,系統會提示密碼。正常來說會顯示以下畫面:
選單依序選擇:防火牆設定 => 自訂 => 其他連接埠,填入5801:tcp。結果如下圖:

確認完畢之後一一退出,即完成設定。
修改防火牆設定(修改IP Table)
如果你的OS沒有setup功能,那麼請直接修改IP Table。請以root帳號修改/etc/sysconfig/iptables#vim /etc/sysconfig/iptables 然後加入以下設定:# Firewall configuration written by system-config-securitylevel
# Manual customization of this file is not recommended.
*filter
:INPUT ACCEPT [0:0]
:FORWARD ACCEPT [0:0]
:OUTPUT ACCEPT [0:0]
:RH-Firewall-1-INPUT - [0:0]
-A INPUT -j RH-Firewall-1-INPUT
-A FORWARD -j RH-Firewall-1-INPUT
-A RH-Firewall-1-INPUT -i lo -j ACCEPT
-A RH-Firewall-1-INPUT -i eth0 -j ACCEPT
-A RH-Firewall-1-INPUT -p icmp --icmp-type any -j ACCEPT
-A RH-Firewall-1-INPUT -p 50 -j ACCEPT
-A RH-Firewall-1-INPUT -p 51 -j ACCEPT
-A RH-Firewall-1-INPUT -p udp --dport 5353 -d 224.0.0.251 -j ACCEPT
-A RH-Firewall-1-INPUT -p udp -m udp --dport 631 -j ACCEPT
-A RH-Firewall-1-INPUT -p tcp -m tcp --dport 631 -j ACCEPT
-A RH-Firewall-1-INPUT -m state --state ESTABLISHED,RELATED -j ACCEPT
-A RH-Firewall-1-INPUT -m state --state NEW -m tcp -p tcp --dport 5801 -j ACCEPT
-A RH-Firewall-1-INPUT -m state --state NEW -m tcp -p tcp --dport 22 -j ACCEPT
-A RH-Firewall-1-INPUT -j REJECT --reject-with icmp-host-prohibited
COMMIT 再重新啟動iptable service,完成設定。#/etc/rc.d/init.d/iptables
restart Flushing firewall rules: [ OK ] Setting chains to policy
ACCEPT: filter [ OK ] Unloading iptables modules: [ OK ] Applying
iptables firewall rules: [ OK ] Loading additional iptables modules:
ip_conntrack_netbios_n[ OK ] 連接到VNC Server
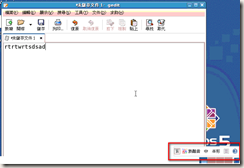
只要透過瀏覽器就可以用Java Applet來開啟VNC請在瀏覽器網址列輸入以下網址:
http://伺服器的IP:5801/ 順利連結便會開啟以下畫面:
輸入OK,然後輸入密碼,如下畫面:

便可以正常開啟遠端桌面,解析度會比較差是正常的事情。

VNC遠端桌面使用中文輸入法
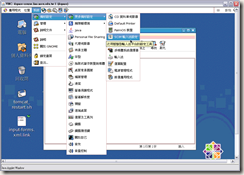
在Windows環境下開啟VNC遠端桌面,由於輸入法的切換組合鍵皆為「Ctrl + Space」,所以會被Windows環境抓去,而無法在VNC遠端桌面發揮效果。解決方法是修改遠端Server上的輸入法切換組合鍵。
設定位置在「系統→偏好設定→更多偏好設定→SCIM輸入法設定」。

進入「介面(前端)→全域設定→快速鍵→作用鍵→…」。

作用鍵勾選「Ctrl」跟「Alt」,按下「新增」。

全部確定退出之後,就可以用「Ctrl + Alt + Space」叫出中文輸入法了。

點選輸入法工具列就可以選擇其它輸入法使用。

[Linux 常見問題] Iptables Open VNC Port To Allow Incoming VNC Connections
http://puremonkey2010.blogspot.com/2016/11/linux-iptables-open-vnc-port-to-allow.html
Source From Here
Question
How do I configure Linux system firewall to allow incoming VNC connections?
How-To
VNC server listens on the following TCP ports:
In other words a VNC server listens for a VNC client on TCP ports 5800+N, 5900+N, and 6000+N where N is the display which starts at zero. So,
Find Out VNC Port
Type the following command:
Update /etc/sysconfig/iptables
Edit /etc/sysconfig/iptables file:
- ...
- -A INPUT -p tcp -m state --state NEW -m tcp --dport 5801 -j ACCEPT
- -A INPUT -p tcp -m state --state NEW -m tcp --dport 5901 -j ACCEPT
- -A INPUT -p tcp -m state --state NEW -m tcp --dport 6001 -j ACCEPT
記得 要和其他的 -A INPUT寫在一起
Save and close the file. Restart iptables:
A Note About Other Linux Distributions
/etc/sysconfig/iptables works only on RHEL / CentOS / Fedora Linux. For other distros update your iptables shell script as follows:
A Note About Other Linux Distributions
/etc/sysconfig/iptables works only on RHEL / CentOS / Fedora Linux. For other distros update your iptables shell script as follows: